Friday, March 19, 2010

Why I'm still "In Training"

Dave & I bought a new couch recently. Here it is so you can "ohhh" and "awww" over it!
Since it's a solid color which we both love, it gives me the chance to jazz it up a bit with some deocrative pillows. Dave & I hit a little issue over what kinds of pillows to get. We got stuck trying to decide if the pillows should match or should we have one decorative pillows and a few solid pillows. It was a huge dilema solved by the girls on The Nest. Their advice? Mix it up!
Sounds good to me! Since I did so well with sewing my cushion for the window seat, I figured I would sew a pillow for the couch from the left over fabric from the window seat.
My idea was to make an envelope pillow. Something that looks like this:
In my mind, the idea was simple. I was also very excited about picking out a button to close the envelope of the pillow. So I sat down and sewed up the two sides of the pillow. The sides came out great, now that I'm an old sewing pro! (haha)
I stuffed the pillow and was ready to get started on the top "envelope" looking portion of my pillow and ran into a problem.

I don't know how to close the top of the pillow without having the stuffing come out of it! I don't think I left enough room on the top front of the pillow to cover over the stuffing. I really don't like the idea of having to start over, but I think I need to admit defeat, look up directions on-line, and start over. (insert giant sigh here).
One last time, here's my failed pillow project. I guess I'm not yet at Domestic Diva status.


A little change in the bathroom

Dave & I have decided our first major change in our home will be to our half bath. We've already gotten some prices for new fixutres, flooring, etc. and we just can't wait to get started.
While we were getting estimates for fixtures for the half bath, we came across a towel bar and toilet paper set that we loved. Only thing is that it would look better in our full bath, than the half bath.
So, we decided for $30 we could spruce up our full bath to try our hand to redecorating a bathroom.
Here's what the bathroom fixtures looked like before, along witht the empty wall that just screamed "I need something!"


Now what I thought would be a 2 minute project of just swapping out the fixtures and adding a new one turned into a 2 night project. After a lot of sweatin', cussin' and a broken nail, here are the new fixtures. Please excuse the 2 giant holes. My dad will be patching them up for me in a few days.

After this project I have learned that there's no such thing as a "2 minuted project" something always goes wrong. What went wrong with this project? Well, I stripped the screws putting on the new toilet paper holder; I have two gaping wholes next to the mirror where the old towel ring used to be and in the process of trying to get the stripped screws into the vanity, I jamed my finger into the vanity and broke a nail.
If I had to do it all over again...........I wouldn't change anything! I love learning experiences.


I love these!!!

I've been obsessing over these wall decor things for a few weeks now at Target.

I thought they were so adorable. They had butterflies & flowers and I just wanted them! Of course, I couldn't see how Dave would enjoy me coming home and putting cutesy flowers or butterflies on the walls of our house. I was in for a surprise.
While we were at Bed Bath & Beyond one day, I saw something similar to the flower 3-D decorations I'd been eyeing at Target. I grabbed the box, crossed my fingers and explained my vision to Dave.
I explained how the flowers would look great above our nightstands since the light fixtures on the nightstands have flowers on them and this would just be keeping with the theme.
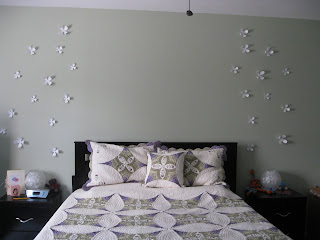
Here's our bedroom and as you can see from the bare wall, we really needed these flowers!


After trying to figure out the best way to place these flowers, I decided to just place them randomly up the wall. That was fine until I realized I would have to mimick that patter on the other side of the wall. (Insert giant sigh here) Anyway, after eyeballing the measurements and using a ruler to guesstimate (that's right, no exact measurements here) I completed my little project! See, no more big bare wall!

Now all we need is a picture for directly over the bed and we'll be all set!

A comfy place to read


When my husband & I first looked at our townhouse, I fell in love with this little window seat/ledge. I could just picture a cushion there where I could sit and enjoy a good book.


Over the past months though, this spot was home to books, magazines, a plant, holiday decorations, cleaning supplies, and basically everything but a cushion where I could sit and read.


See here is where it's being used to hold some decoratins.


So after some searching for a cushion that would fit this spot and realizing nothing would fit, I came to accept the scary truth: I would have to make a cushion for this area.


Now I'm not a sewer and I don't own a sewing machine either. The only time I have ever sewed anything in my life was when I was 12 in Home Ec class. I made a pig pillow. I'm not sure if it came out good or what my grade was, but it must not have been good since I hadn't attemped to sew anything in the many years that followed.


I discussed the homemade cushion idea with my husband who was more than enthusiatic about having me make something for the house. I think it was his faith in me that I could do this that encouraged me to go to my nearest fabric store and try my sewing skills.


I bought a huge cushion that I cut in half and placed one half on top of the other so the cushion would be comfy. Dave helped me pick out the fabric and after paying it was now the moment of truth. Would I be able to pull this off or would this project be a huge waste of money??


Well.........


Not bad for my second sewing job, right?! I've tested it out many times and it's the perfect spot to enjoy a good book or to just sit and gaze out the window.
After completing the cushion and sitting on it to make sure the seams didn't rip, I finally fessed up to my husband that I had only sewn once before in my life. Needless to say, he was impressed. So was I!


Thursday, October 29, 2009

Skirt Steak and Cheddar Mashed potatoes

This is so far, the BEST meal I've made since beginning the blog. It was so quick to make (I had left over mashed potatoes from the other day, so that made it quick) and the taste was unbelievable. I'm still working on presentation for my pictures. I think I need to take a class in food presentation. haha!

Overall rating:

Dave: perfect, don't change a thing

Jeanine: delicious, best meal so far

Sunday, October 25, 2009

Fall is in the air!

I love fall! It's my favorite season. I love budling up in sweaters, watching the leaves change, pumpkin picking, the smell of apple pies baking, celebrating my wedding anniversary! I never really decorated for fall, just a few Halloween pictures on the windows and that's it. With this being our first fall in the new house, I figured I'd decorate a little more towards the fall theme. I love the scarecrows in front of the fireplace, they were a gift from my mother in law. I also love the fall floral arrangement on the coffee table, and it has an element of Halloween as well.

Friday, October 23, 2009

Chicken Risotto

Prepared risotto
chicken breasts - skinless & boneless
balsamic vinegar
thyme
zucchini
asparagus
shredded parmesan
Olive oil
2 tablespoons butter

Prepare risotto as per directions.
Sprinkle chicken with balasmic vinegar to coat and sprinkle a little thyme on each side of the chicken.
Cook in olive oil in a skillet over medium heat until cooked through.
Slice Zucchini and cut up asparagus and toss together in an oven safe dish with butter and parmesan cheese. Bake in over at 350 for about 20 minutes, then broil on high for about 7 minutes stirring occasionaly so as not to burn.
When chicken is done cooking, cut into strips. When risotto is finished cooking, place the chicken strips on top of the risotto and serve with the veggies.